Before You Begin
Make sure your AI Receptionist has an assigned phone number so incoming calls can reach the receptionist and be transferred to a configured destination when required.
First-Time Call Routing Setup
When Call Routing has not been configured yet, the Call Routing option is available directly from the dashboard. Use it to start the initial setup.
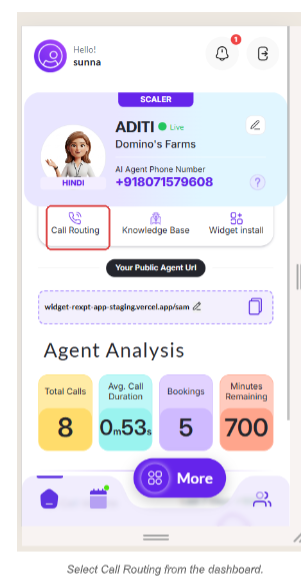
Step 1 — Open Call Routing
Open the Call Routing setup so you can define how calls should be handled when a caller needs a specific department. From the dashboard, select Call Routing. This opens the Dynamic Call Transfer setup.
Step 2 — Add a Call Triage Department
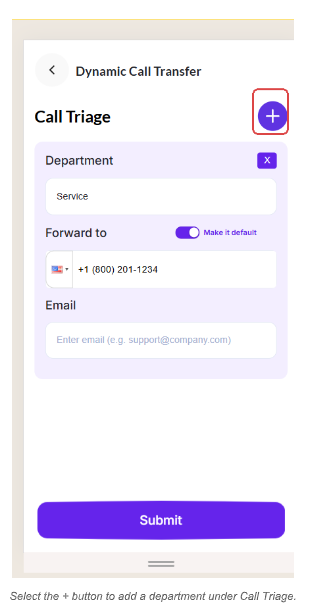
Call Triage is used to create department-level routing entries. Each entry defines the team that can receive calls for a particular type of customer request. On the Dynamic Call Transfer screen, locate Call Triage and select the + button to add a department.
Step 3 — Select a Department
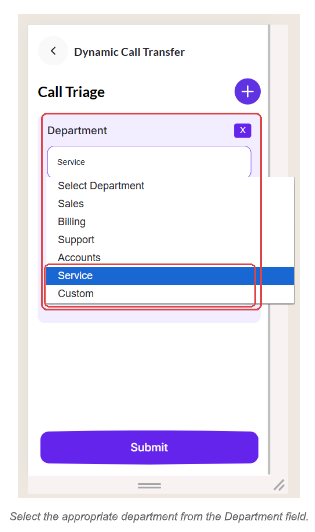
Select a department that matches the type of customer request the team is expected to handle. This helps organize transfer routing around the caller's concern.
- Sales — Product or service enquiries, pricing, quotes, purchases, or new business enquiries.
- Billing — Invoices, payments, charges, or other billing-related questions.
- Support — Existing-customer help, product issues, service issues, or support requests.
- Accounts — Questions related to customer or business accounts.
- Service — Requests or concerns related to an existing service.
- Custom — A department or request type that is not covered by the standard department options.
Step 4 — Configure a Custom Department
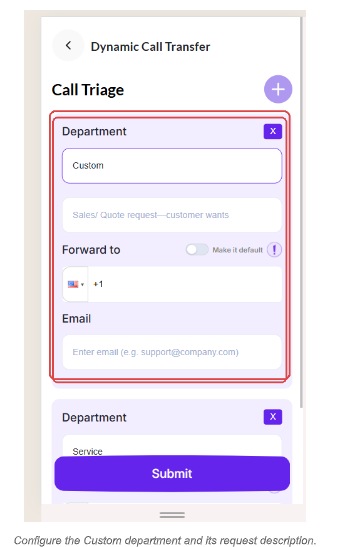
Use a Custom department when the available standard department options do not match the team or request type you want to route. A clear request description helps define what the custom department is intended to handle. Select Custom, then enter the required custom department information in the fields provided.
Step 5 — Configure the Forwarding Destination
Define where calls for the selected department should be forwarded when the AI Receptionist determines that a transfer is required. Under Forward to, enter the phone number that should receive calls for the department. Use the country selector where applicable and verify the number before submitting.
Step 6 — Add the Department Email
Add the email address associated with the department so the department's contact information is included in its routing configuration. Enter the appropriate business email in the Email field.
Step 7 — Set a Default Department
Use the default setting when you want one department to act as the general destination for calls that require a transfer but do not clearly match another configured department. Turn on Make it default for the department you want to use as the default transfer destination.
Step 8 — Configure Fallback for Highly Escalated Calls
Fallback provides an escalation path for highly escalated calls, such as conversations where the caller is very angry or frustrated and the situation requires escalation. When Fallback is enabled, the AI Receptionist can route a highly escalated call to the configured fallback destination.
Step 9 — Add Additional Departments
- Select the + button to add another department.
- Configure the department and its forwarding destination.
- Use Custom when the required department is not available in the standard list.
- Set a default department only when a general transfer destination is required.
Step 10 — Submit Your Configuration
Review the department, forwarding number, email, default setting, and any custom information, then select Submit. This saves the Call Routing setup so the configured department and transfer information can be used by the AI Receptionist.
How Call Routing Works
Call Routing helps the AI Receptionist determine when a caller's concern should be transferred to a configured department instead of continuing through the normal call flow. If the caller requests a specific department and the concern requires a transfer, the AI Receptionist can use the matching Call Triage configuration. If no transfer is required, the normal call flow continues.
For example, a pricing or new-business enquiry can be routed to Sales, while an invoice or payment concern can be routed to Billing.
How Fallback Works
Fallback provides an escalation route for highly escalated conversations when additional human assistance is needed. If a caller becomes highly angry or frustrated and Fallback is enabled, the AI Receptionist can route the call to the configured escalation destination.
If the Department Is Unavailable
According to the supplied Call Transfer requirements, the call should not go to voicemail. The AI Receptionist should clearly inform the caller that the call was not transferred or was not picked up.
Manage Call Routing After Initial Setup
After Call Routing has been configured and saved for the first time, the existing configuration can be managed or edited from the settings available through More. Use this area to update departments, destinations, default routing, or other available routing details.
Confirm Your Setup
- Call Routing was opened directly from the dashboard for the initial setup.
- Required departments have been added.
- Forwarding numbers are correct for each department.
- Custom departments include the required request information.
- Department email information is correct.
- Default routing is enabled where required.
- Fallback is enabled where escalation-based transfer is required.
- The configuration has been submitted successfully.
Related Guides
- Set Up Call Forwarding
- Configure Call Triage
- Test Your AI Receptionist
- Manage Call Settings