Create your Rexpt account
Step 1 — Sign up for Rexpt
Create a new Rexpt account using your email address and complete the account verification steps shown on screen.
Step 2 — Start creating your AI Receptionist
After sign-up is complete, continue into the onboarding flow to set up your AI Receptionist for your business.

Create your AI Receptionist
Step 1 — Enter your business phone number
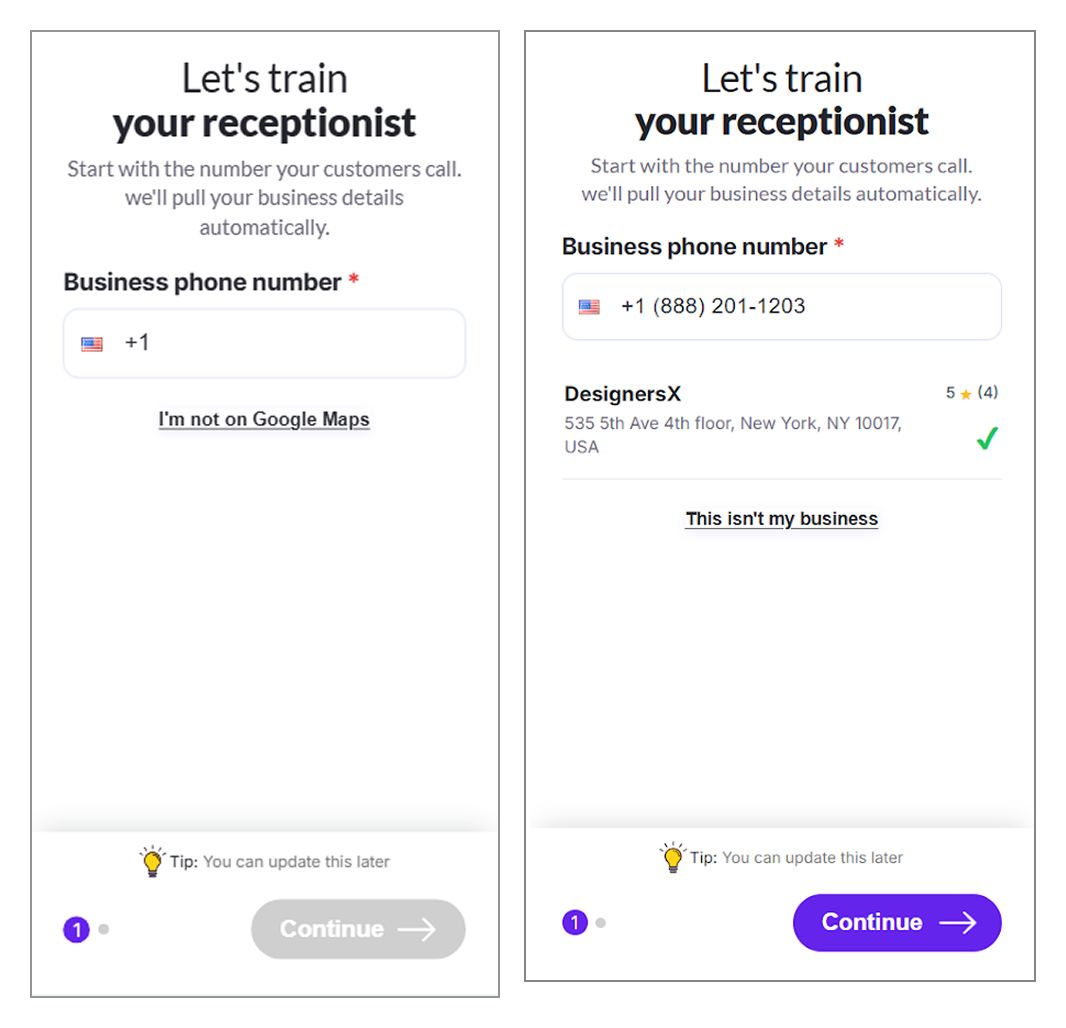
Enter your business phone number in the Business phone number field.
Rexpt uses this number to search for your business information.
Step 2 — Review your business match
If Rexpt finds a matching business, review the displayed business name and address.
If the information is correct, select Continue.
If the displayed business is not yours, select This isn't my business.
Step 3 — Add your business details manually
If Rexpt cannot find your business, check that the phone number is correct or select Add details manually.
Enter the required business information, including:
- Website
- Business name
- Business address
- Business phone number
Select Continue when the information is complete.

Select your business type
Rexpt uses your business category to better understand your business and how your AI Receptionist should handle customer conversations.
Step 1 — Review your business category
If Rexpt retrieves your business category automatically, review the displayed category and continue.
Step 2 — Select a category if needed
If a category is not detected automatically, choose the business type and category that best match your business.
Select Continue to move to the next step.

Configure your AI Receptionist
Step 1 — Select a language
Choose the language your AI Receptionist should use when speaking with customers.
Step 2 — Select the receptionist role
Choose the role that best matches how you want the AI Receptionist to help your business.
Available roles may include options such as:
- Inbound Lead Generation
- Handle Call Reception
- Customer Support
Step 3 — Create your AI Receptionist
Review your selections and select Finish.
Rexpt will begin creating your AI Receptionist.
During this process, Rexpt prepares the business logic, applies safety and guardrails, trains the receptionist to handle common questions, and selects a suitable voice and character.

Test your AI Receptionist
Before going live, test your AI Receptionist to understand how it responds to customers.
Step 1 — Review your receptionist
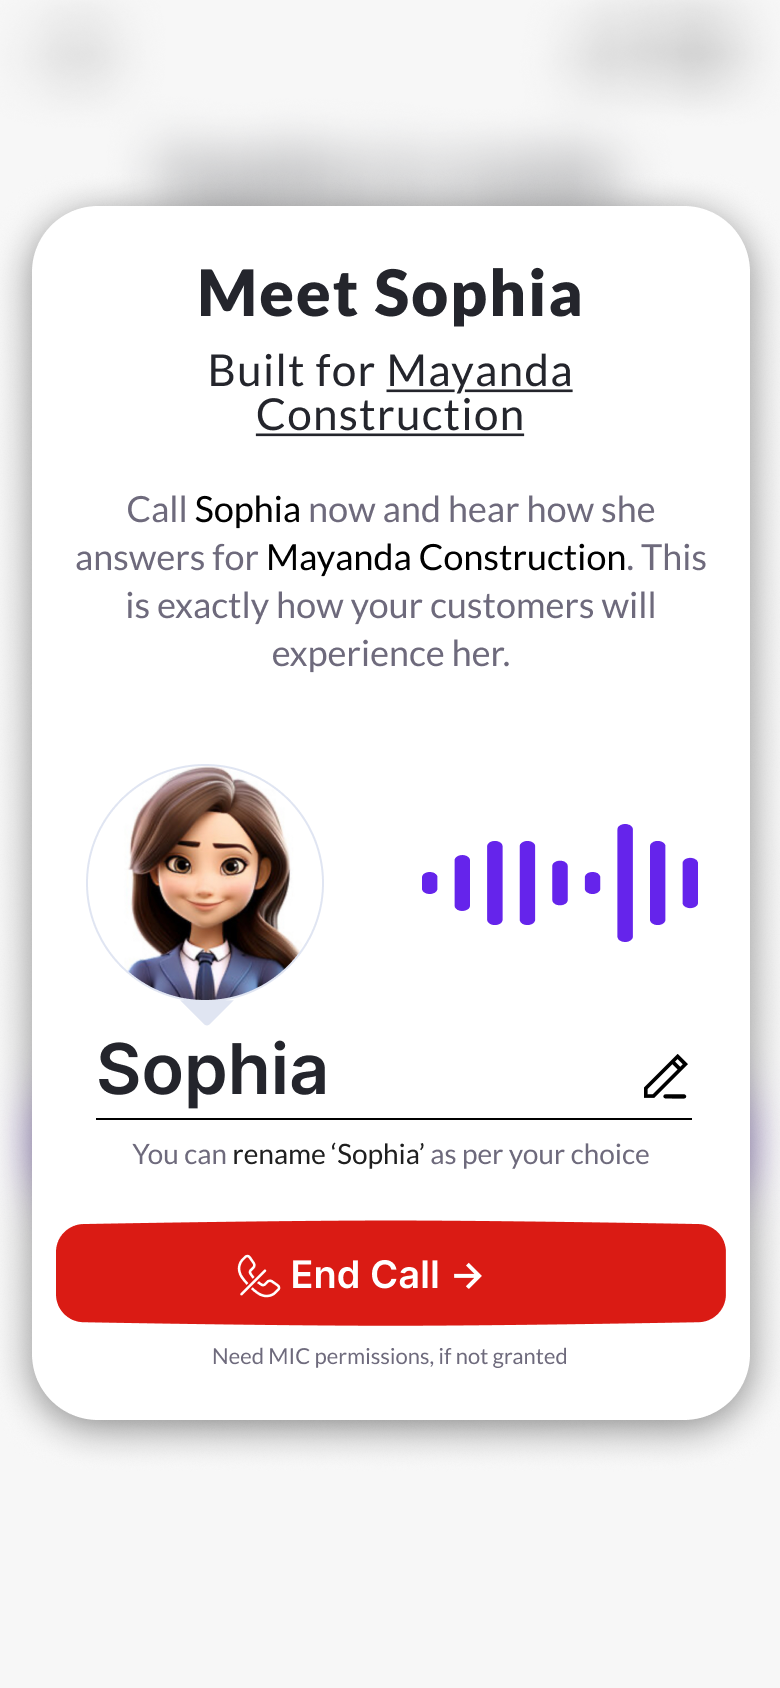
Review the AI Receptionist name and profile.
If needed, use the edit option to update the receptionist’s name.
Step 2 — Start a test call
Select Make Web Call Now.
Allow microphone access if your browser asks for permission.
Step 3 — Try common customer questions
Speak to the AI Receptionist as a real customer would.
You can test questions about:
- Your services
- Plans or pricing
- Common customer enquiries
- How your business works
- Appointments or bookings
Use the test call to confirm that the AI Receptionist is responding as expected before continuing.
Go live and activate your plan
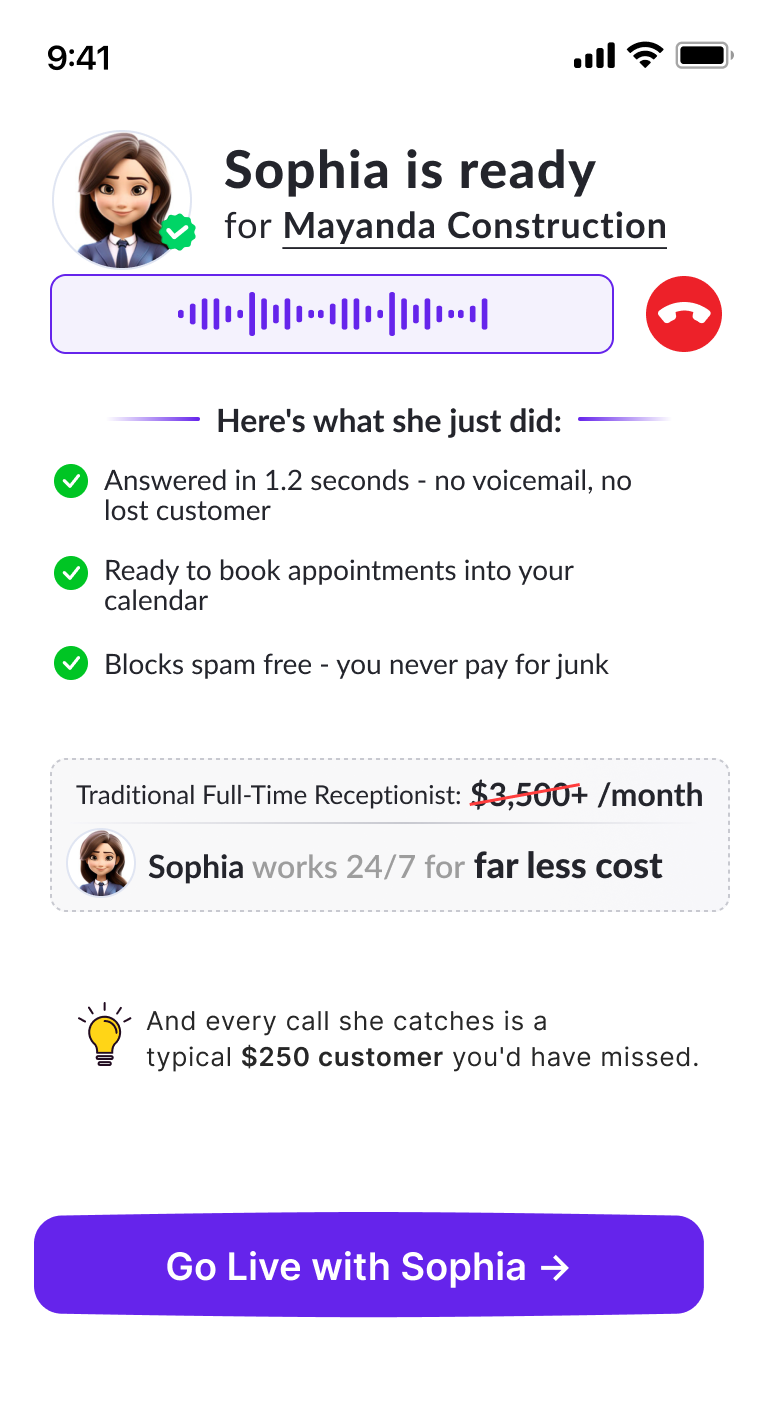
After testing your AI Receptionist, continue to the activation and payment step.
Step 1 — Review the plan
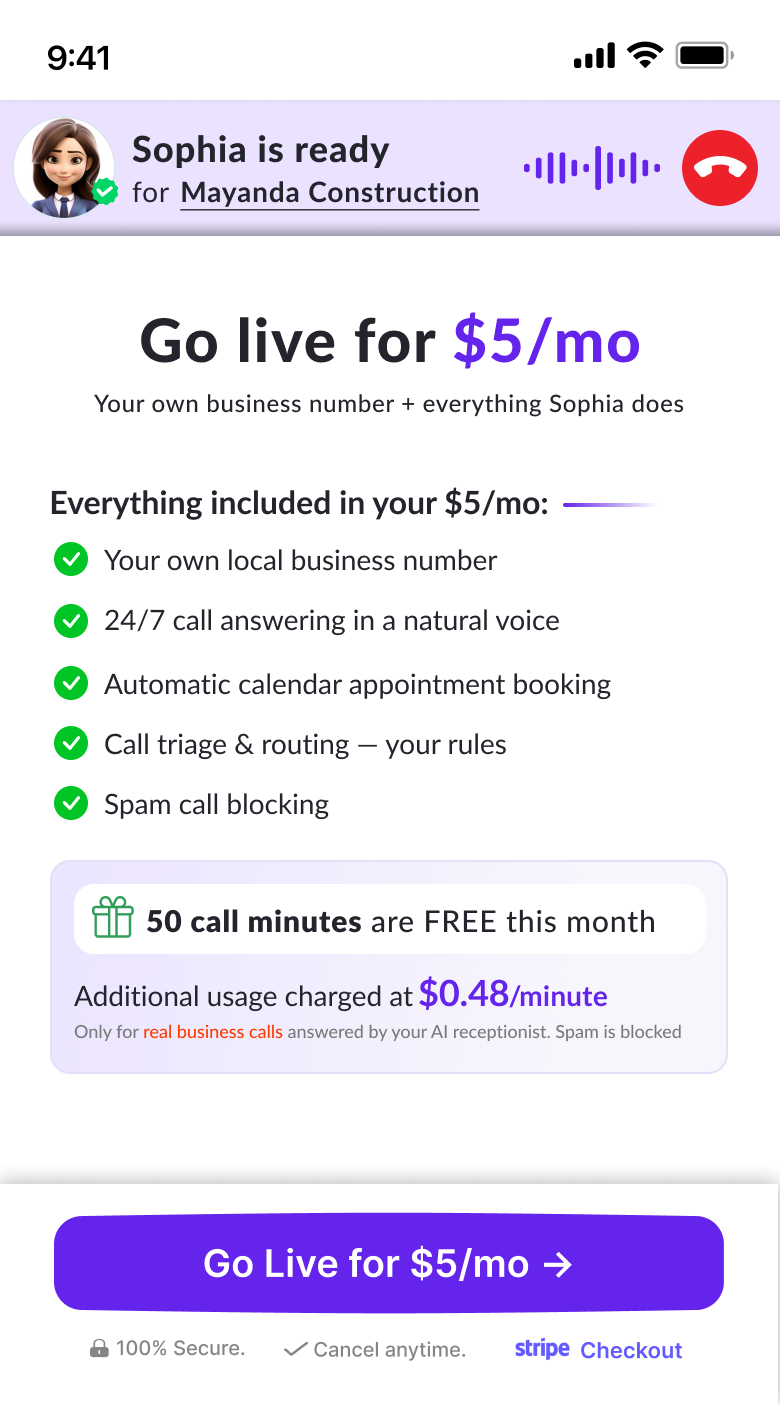
Review the displayed subscription and usage details before continuing.
Step 2 — Complete payment
Select Go Live For $5/Mo to open checkout.
Review the:
- Subscription
- Currency
- Payment method
- Amount
Complete the payment to activate the subscription.
Step 3 — Confirm activation
After successful payment, Rexpt confirms that your subscription has been created.
You can then continue with the remaining setup steps.
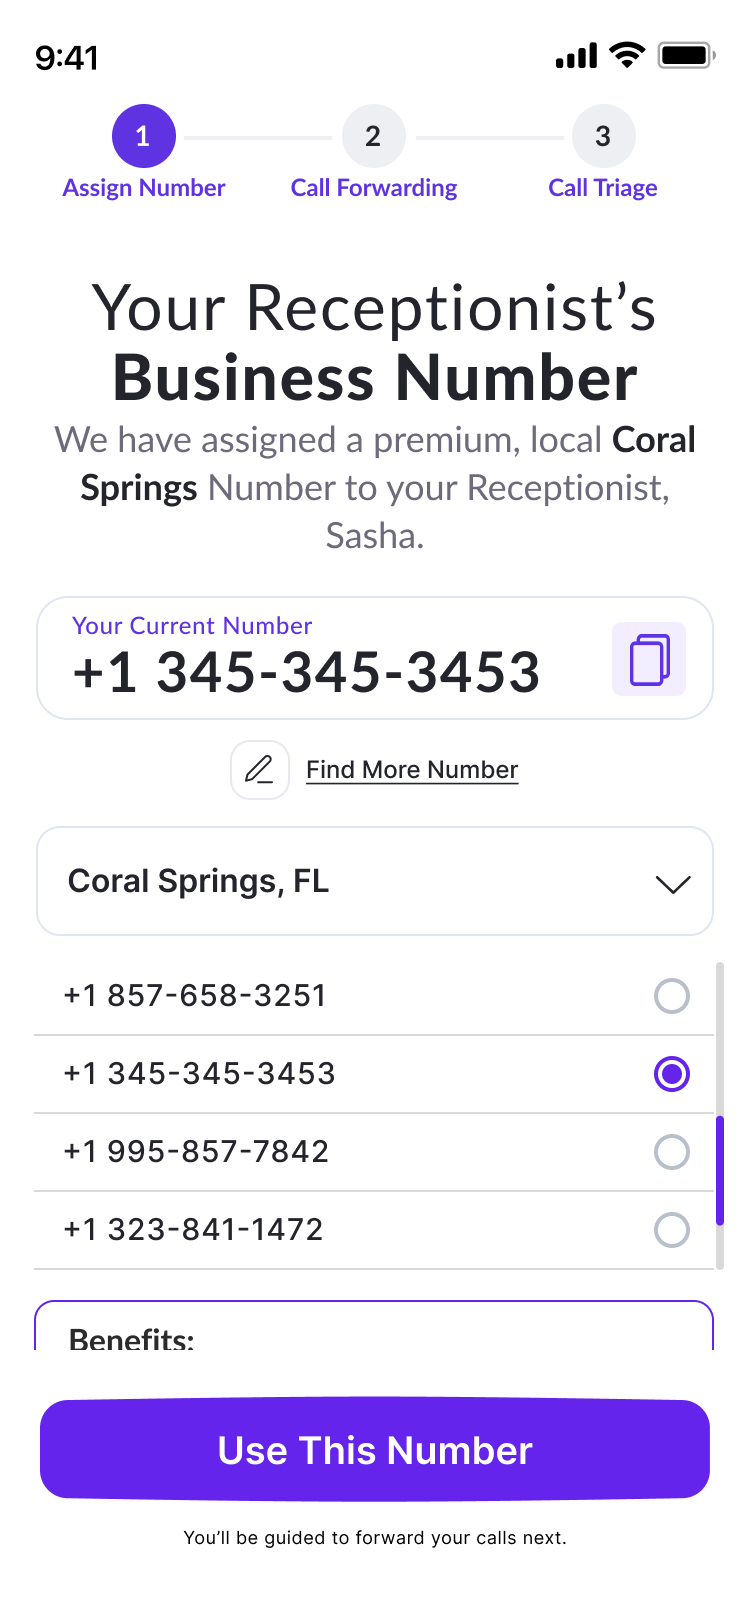
Assign a phone number
Rexpt provides a dedicated phone number that customers can use to reach your AI Receptionist.
Step 1 — Review the available number
Review the local phone number and location displayed by Rexpt.
Step 2 — Reserve the number
Select Use This Number to assign the number to your AI Receptionist.
This number can be used as the public phone number for your AI Receptionist.
Set up call forwarding
If you want customers who call your existing business number to reach your AI Receptionist, you can configure call forwarding.
Call forwarding is optional.
Step 1 — Select your phone carrier
Choose the carrier used by the business phone number you want to forward.
Rexpt uses the selected carrier to provide the appropriate forwarding instructions.
Step 2 — Choose when calls should be forwarded
Select the conditions under which calls should be forwarded to your AI Receptionist.
Available options include:
- All Calls
- When Busy
- When Unanswered
- When Unreachable / Switched Off
You can select the forwarding option or options that match how you want your existing business number to work.
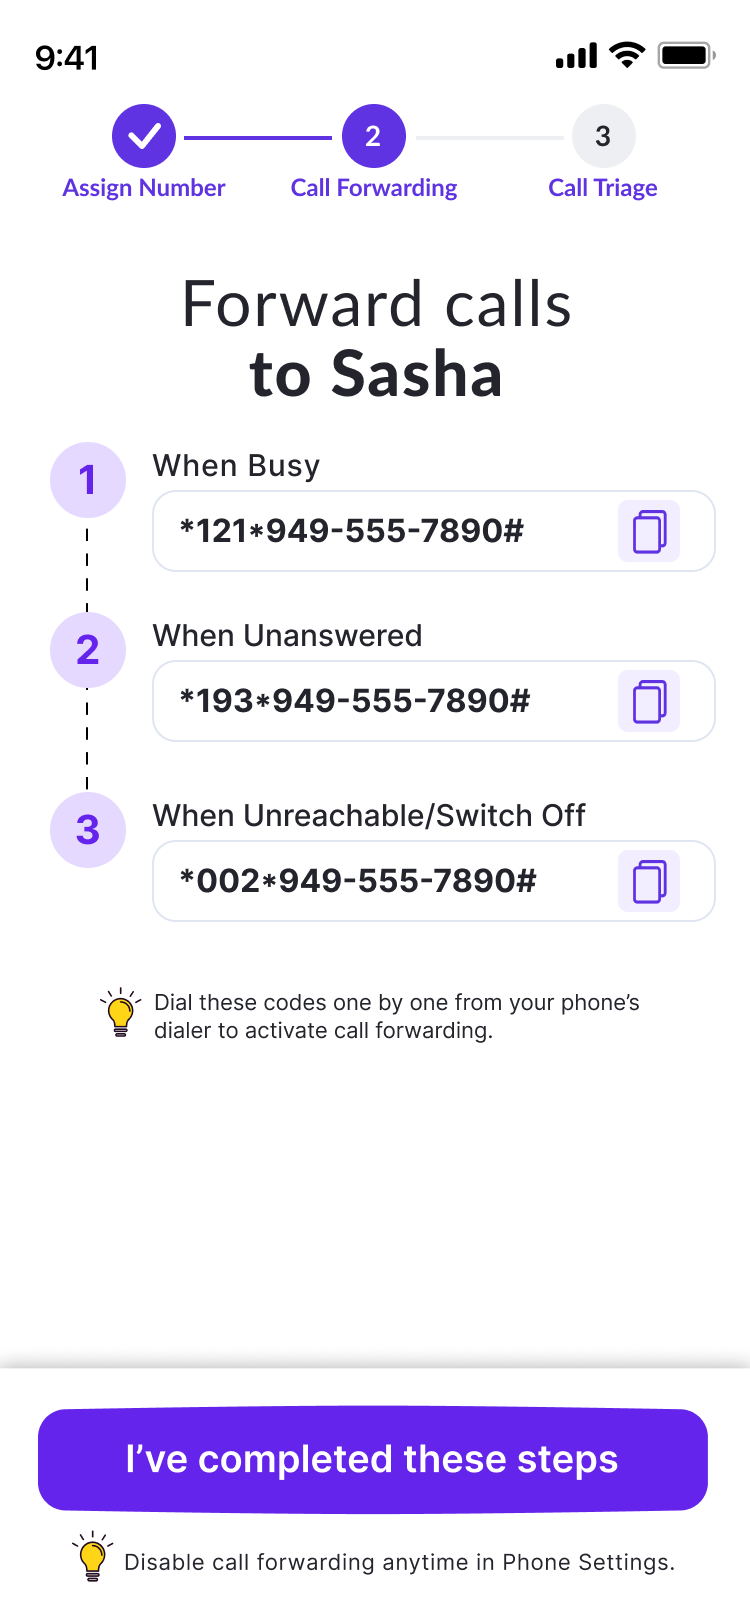
Step 3 — Apply the forwarding code
Rexpt displays the forwarding code based on your selected conditions.
If you select All Calls, Rexpt provides one forwarding code.
If you select multiple conditions, such as When Busy, When Unanswered, and When Unreachable, Rexpt provides a separate code for each condition.
Open the phone dialer for your business number and dial each displayed code one by one to activate the selected forwarding rules.
[Image placeholder — 3 screenshots horizontally: Select carrier | Choose forwarding conditions | Forwarding code(s)]


Step 4 — Confirm that call forwarding works
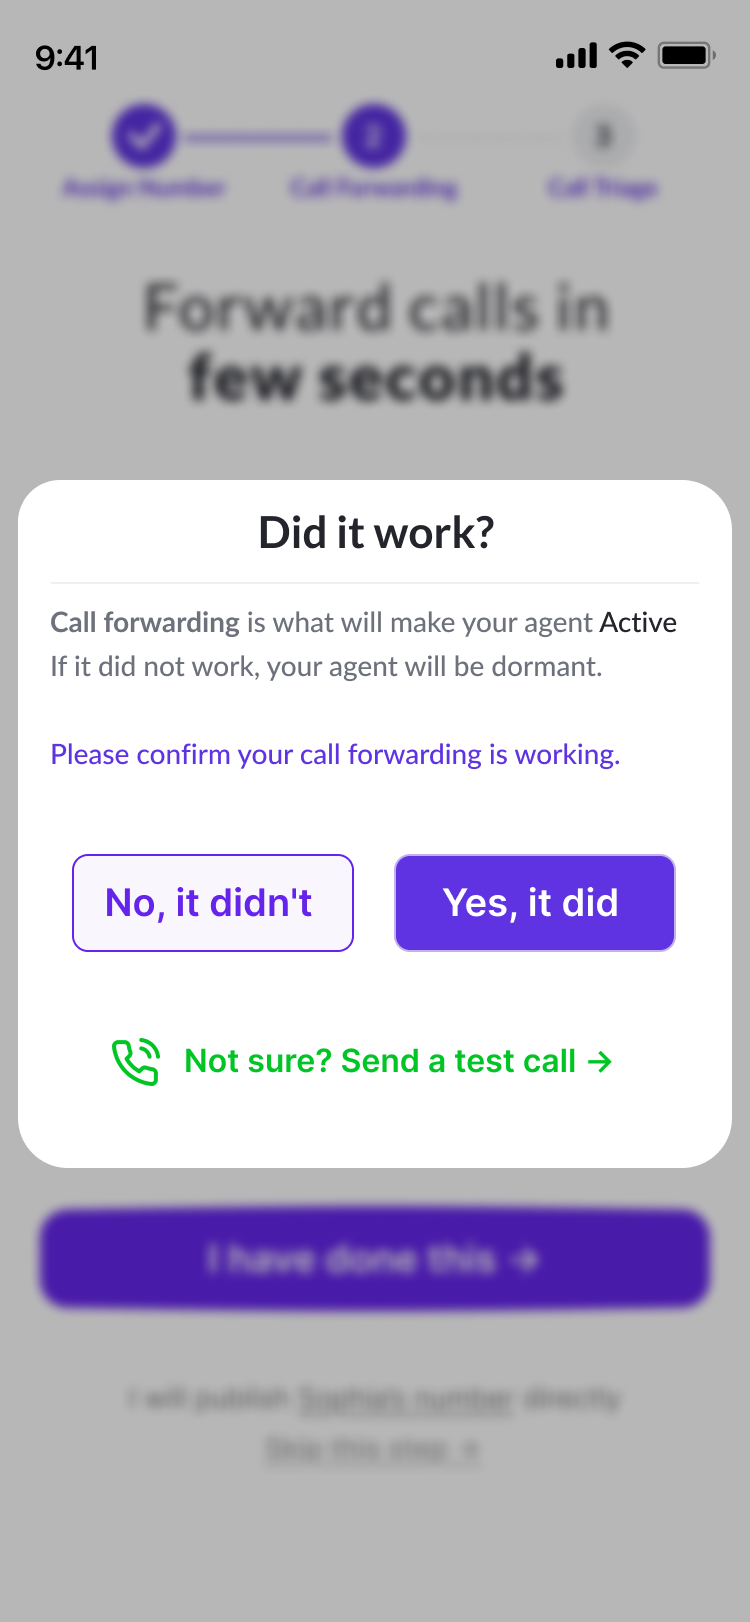
After applying the forwarding code, Rexpt asks whether the setup worked.
Select:
- Yes, it did if forwarding is working.
- No, it didn't if the setup did not work.
- Send a test call if you are not sure.
Skip call forwarding
If you do not want to connect your existing business number, select Skip call forwarding.
You can use the assigned Rexpt number as your public number instead.
Troubleshoot call forwarding
If call forwarding does not work, Rexpt provides additional options to help you verify and fix the setup.
Try the forwarding instructions again
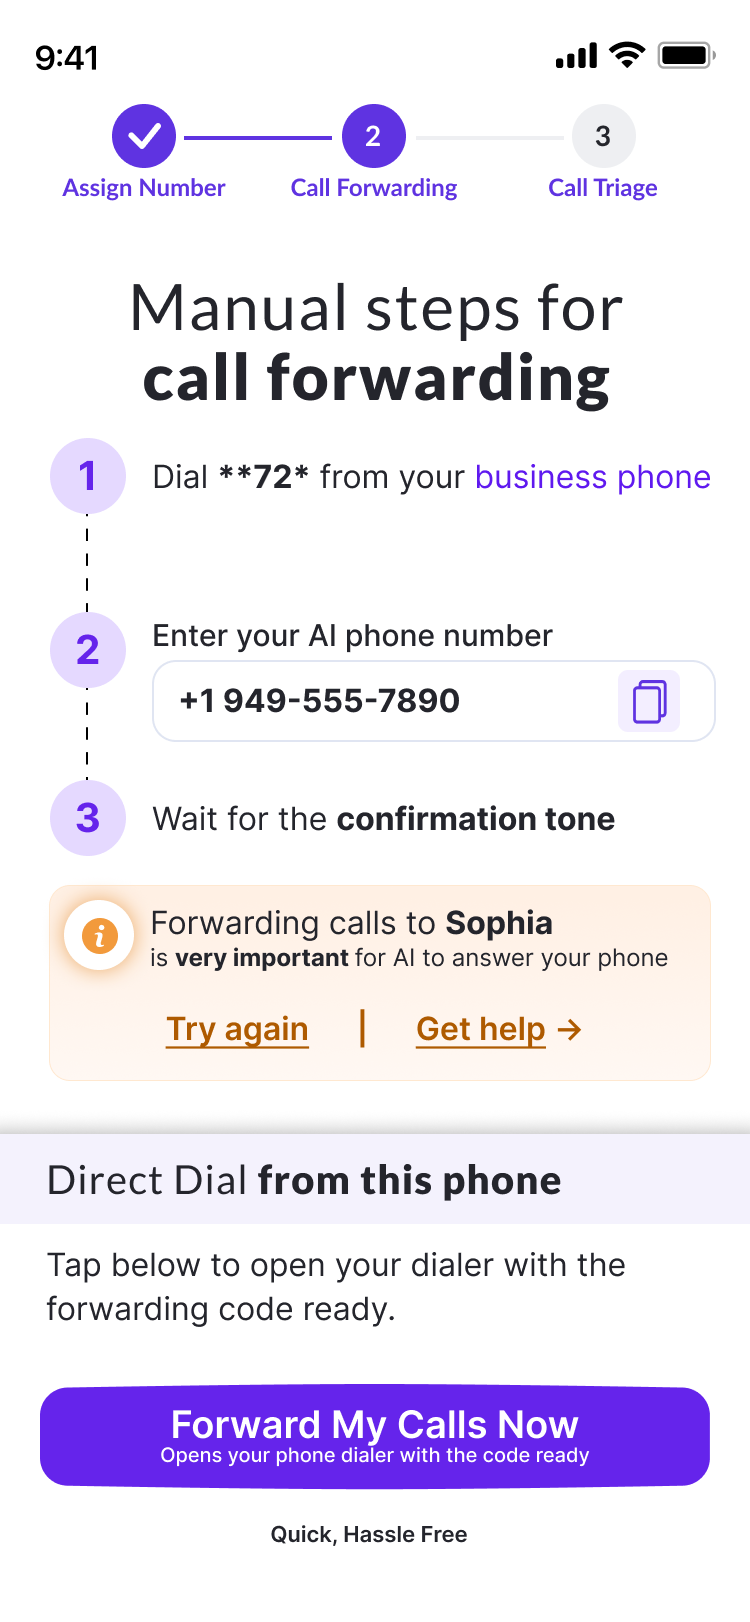
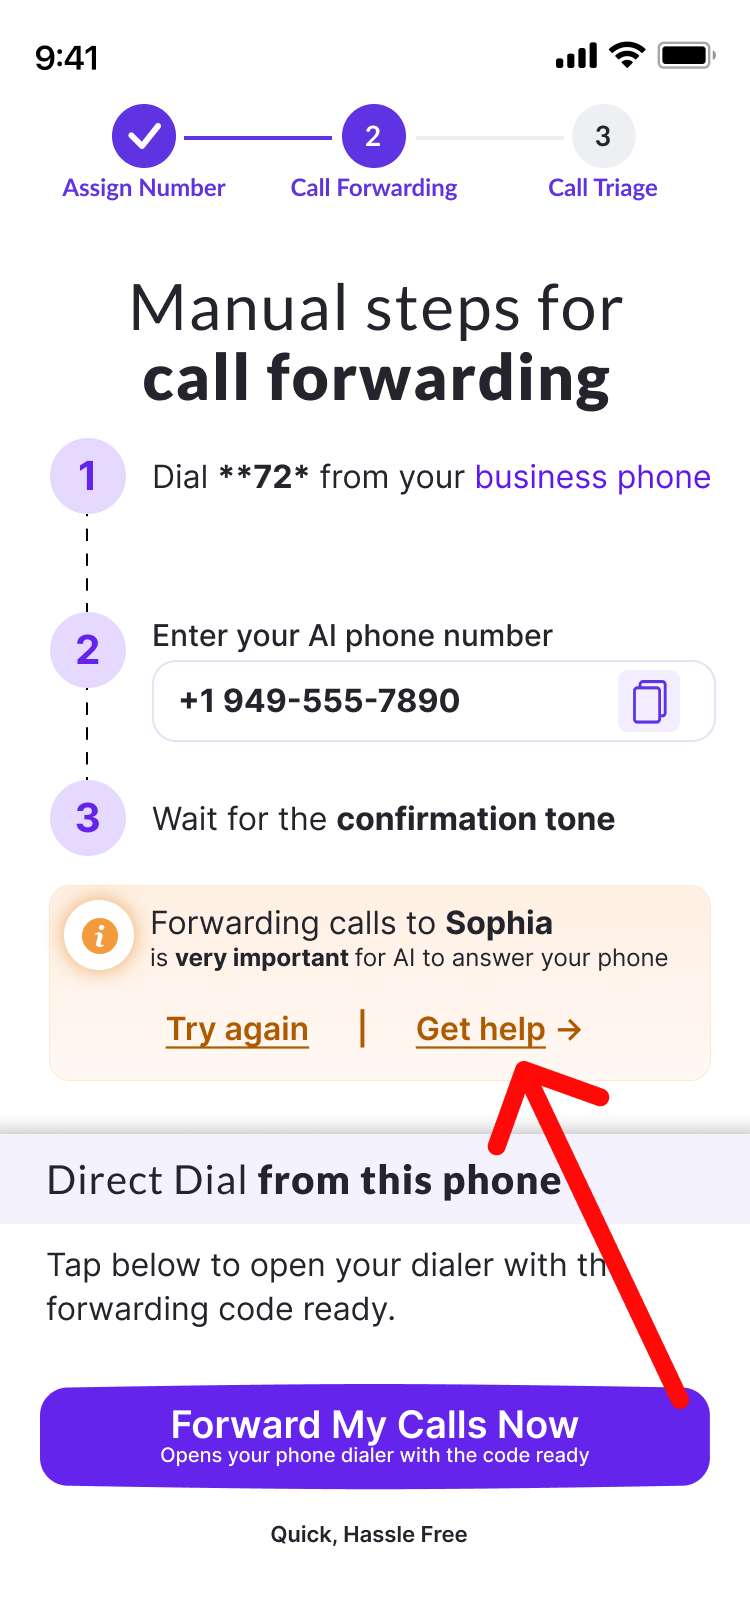
Select No, it didn't when the confirmation message appears.
Rexpt will show the manual call-forwarding instructions and forwarding code again.
Review the instructions and select Try again after making the required changes.
Send a test call
If you are unsure whether forwarding is active, select Send a Test Call.
Confirm the displayed business phone number and select Call Now.
Rexpt places a test call so you can check whether the call reaches your AI Receptionist.

Get additional help
If forwarding still does not work, select Get help.
The Call Forwarding Help screen provides troubleshooting guidance for areas such as:
- Forwarding code
- Selected carrier
- Destination number
- Device settings
- Wi-Fi calling
- Voicemail
- Network configuration
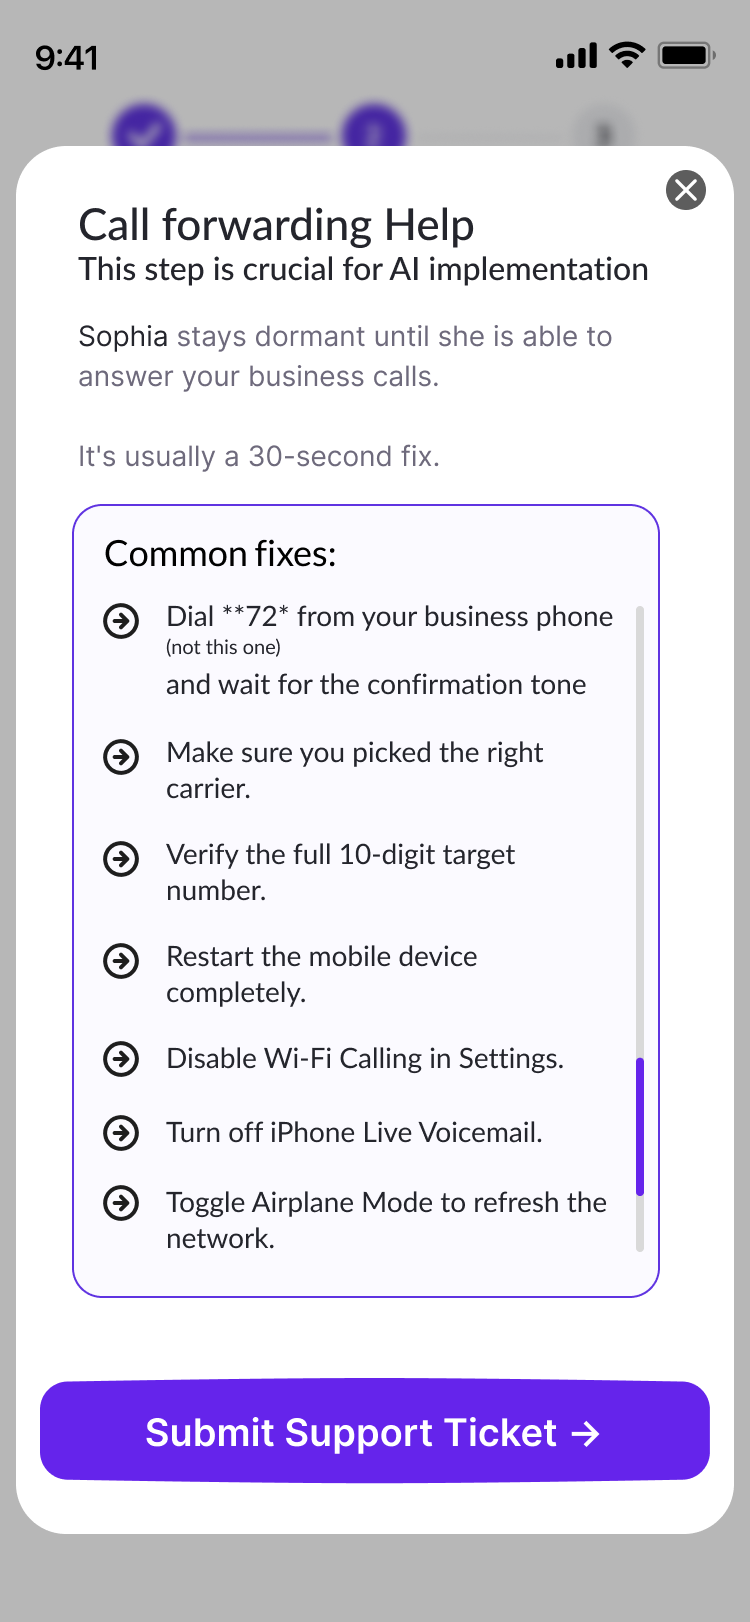
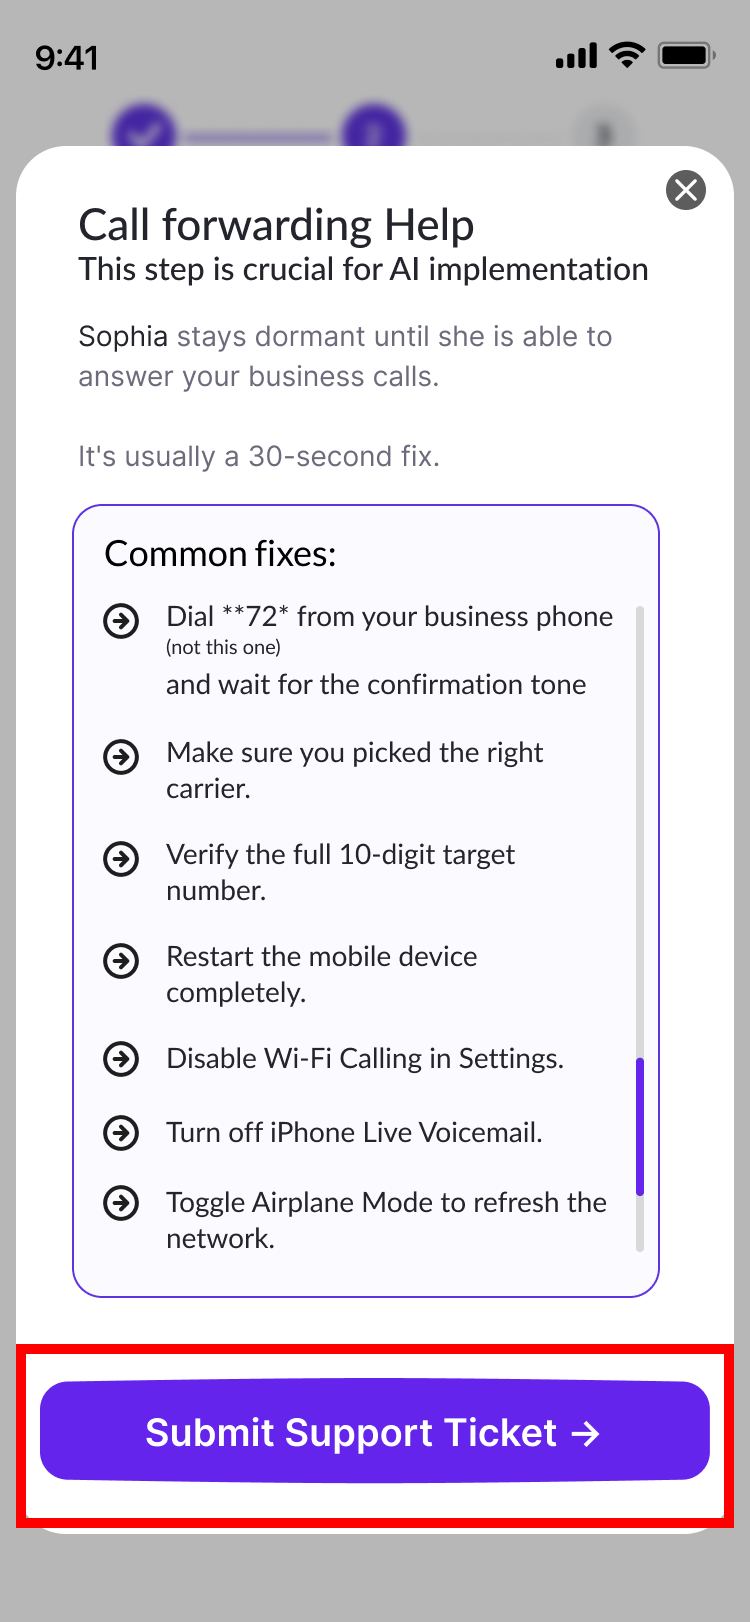
If the issue is still unresolved, you can continue to get support.
Submit a support ticket
Select Submit Support Ticket to open the Tickets page.
Then select Create New Ticket.
Enter the required ticket details:
- Subject
- Category
- Description
- Priority
- Department
Agent Code and Attachment are optional.
Select Submit to create the support ticket, or select Cancel to discard it.
Configure call triage
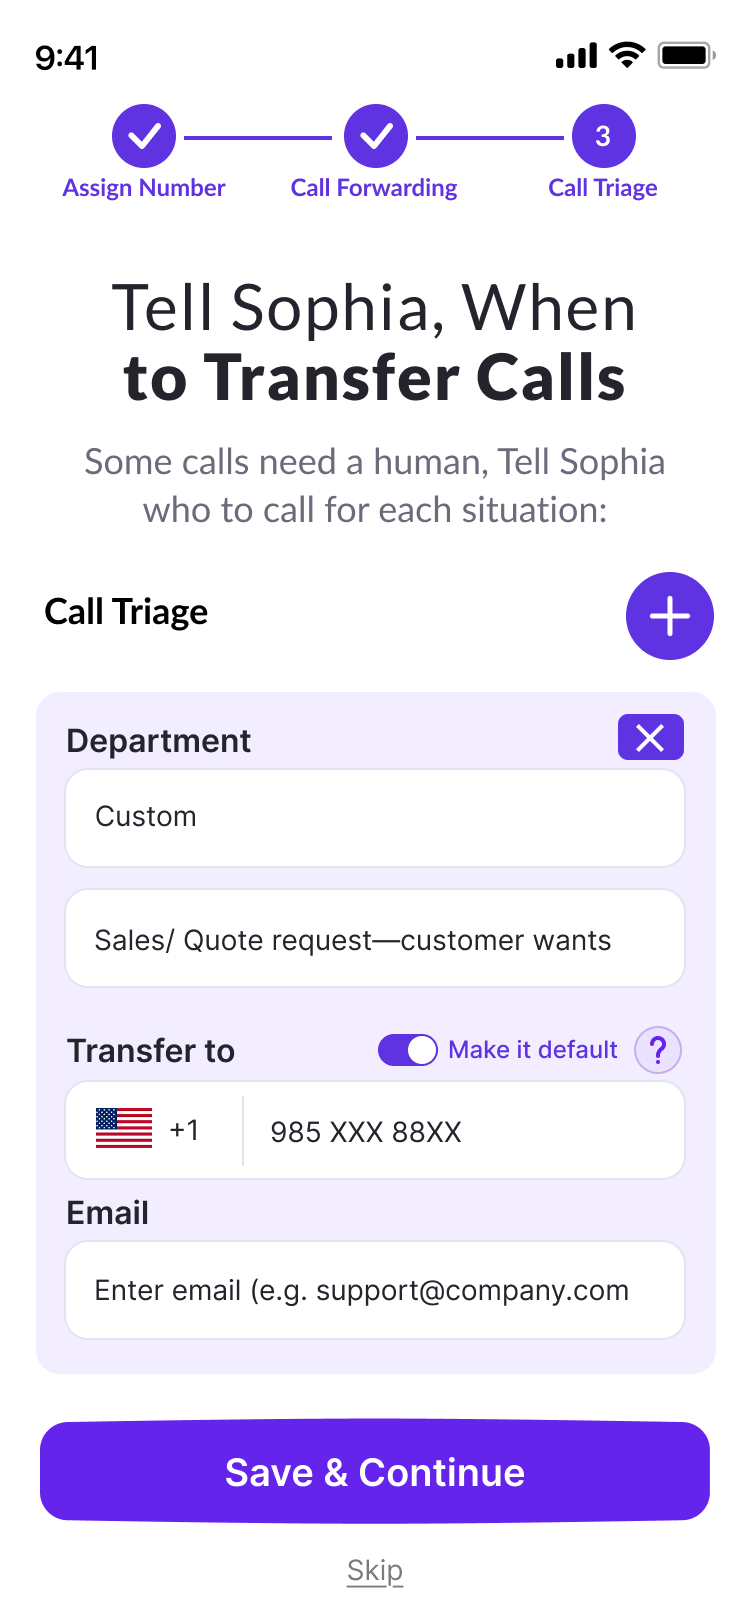
Call triage lets your AI Receptionist transfer certain calls to a human representative.
This setup is optional.
Step 1 — Add a department
Add the department or transfer category that should receive calls.
For example:
- Service
- Sales
- Support
- A custom department
Step 2 — Add the transfer number
Enter the phone number where calls for that department should be transferred.
Use Make it default if you want that number to be the default transfer destination for the department.
Step 3 — Configure fallback
Use the Fallback option when customers who need human assistance should be transferred directly to a representative.
Fallback can be enabled for only one department at a time.
If you enable it for another department, the fallback setting moves from the previously selected department to the new one.
Step 4 — Save the call triage setup
Review the departments, transfer numbers, and routing settings.
Select Save & Continue to proceed.
If you do not want to configure call triage during onboarding, select Skip.
Set up caller recognition
Rexpt can use your saved contacts to help the AI Receptionist recognize known callers.
Step 1 — Allow contact access
When the Contact Access screen appears, select Allow Contact Access to continue.
If you do not want to configure contacts now, select Skip — I'll set this up later.
Step 2 — Sync your contacts
Select Sync Contacts and choose Google Contacts.
Complete the requested permission flow to allow Rexpt to access the available contacts.
Step 3 — Review your synced contacts
After synchronization is complete, review the contacts in the contact recognition section.
Your AI Receptionist can use saved names and phone numbers to recognize known callers.

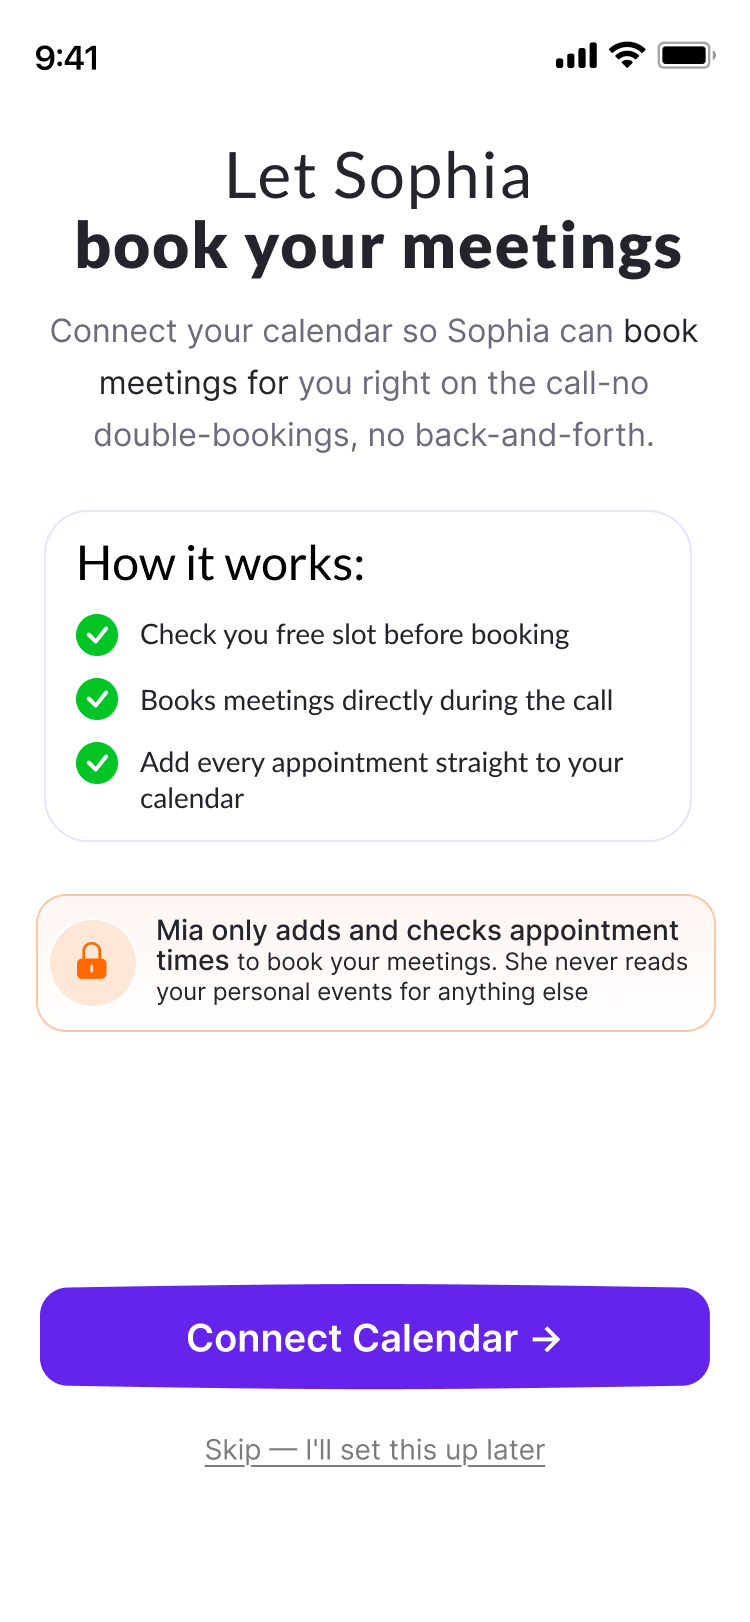
Connect your calendar
Connect Google Calendar so appointments booked through your AI Receptionist can be reflected in your calendar.
Step 1 — Continue to calendar setup
After contact synchronization, select Complete Setup to continue.
Step 2 — Connect Google Calendar
Connect your Google Calendar account and grant the requested calendar permissions.
Step 3 — Keep track of bookings
Once connected, appointments booked through your AI Receptionist can be reflected in your Google Calendar, helping you keep track of scheduled customer appointments.
Complete your setup
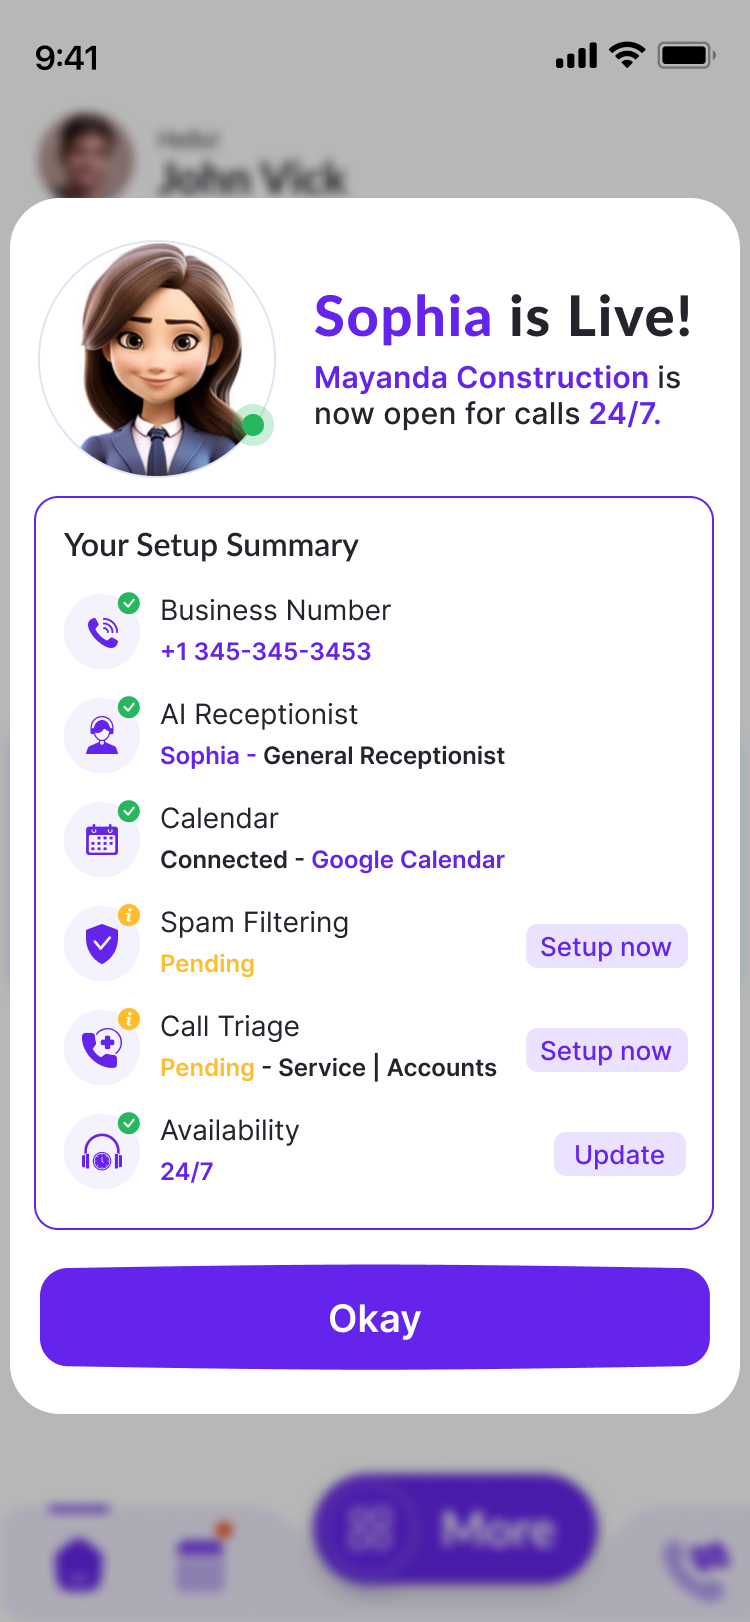
After the onboarding steps are complete, Rexpt displays a confirmation showing that your AI Receptionist is live.
Step 1 — Review your setup
Review the available setup information, including:
- Business number
- AI Receptionist
- Calendar
- Spam filtering
- Call triage
- Availability settings
Select Okay to close the confirmation.
Step 2 — Complete skipped items later
If you skipped an optional setup step, you can complete it later from the Rexpt dashboard.
Select Do it Later if you want to continue to the dashboard without configuring additional options now.
Confirm your setup
Before you start using your AI Receptionist with customers, confirm that the following settings match your business requirements:
- Business information
- AI Receptionist language and role
- Assigned phone number
- Call forwarding
- Call triage
- Contact access
- Calendar connection
Your Rexpt AI Receptionist is now ready to handle customer calls based on the configuration you selected during onboarding.